
Paeonia mlokosewitchii shoots after cold stratification; the first stage, roots growing was shown in the previous post (Cold stratification: part 3, the practicals)
Finally the spring arrives – only in our story about the cold stratification 😊We tried our best sowing and providing the cold stratification.
Is there any guarantee that all seeds will germinate well?
Of course not, hope is good, but kept on the realistic side. Sowing and germinating seeds is not a precise science, and many factors, some out of our control, can contribute to a low germination or no germination at all; reason why keeping your pots for at least another year it is always a good idea.
However, at least some species will germinate, and then you may have to deal with too many seedlings! I always recommend to sow smaller batches of seeds every year, instead of 30 pots at once. And, combine easy germinating species with some of the more difficult ones.
What to do when the weather starts to warm up?
I would like to say that we just sit and watch the seeds germinating, but it’s not quite like that 😊

Caulophyllum thalictroides first shoots, after direct sowing (2 years germinator!); work carefully in the spring around the spots where you’ve sown seeds in the ground.
Usually a visible warm up may happen in March in our region, sometimes even later. Not all winters are the same. Unlike the groundhogs, I predict that we will have a very late spring, with short interludes of warm weather here and there.
In case of direct sowing, after the snowmelt, remove the layer of dead leaves/mulch or any other materials you used for extra protection. The best is still to come weather wise, so watch the spot for germination without scratching the ground! In shaded locations it is a good idea to sprinkle a bit of slug pellets around (for just in case).
In case of sowing in moss, there is nothing else to do than waiting for the germination. If too many seedlings appear you will have to transplant some of them later in the season.
In case you sowed in pots, after the snow has melted, open the box(es), or remove any other wrappings from the trays and cold frame to inspect the pots. Most of them will be frozen. Do not worry (follow cold stratification parts 1,2,3); slowly they will start to warm up.
Ideally, boxes and flats with pots should be lifted from the ground on a higher surface to receive more light = warmth. It also makes it easier to keep an eye on them. If March is still very cold, then do this in April.
In case of using a cold frame: open the lid as soon as possible and remove some of the protecting materials. Make a thorough inspection for slugs (eggs can also be at the bottom of pots). Let the lid open as much as possible during warm, sunny days and close it back at night. Most likely you can let go of a part of the wrapping layers.
There is not much to do in the garden so early in the spring. To fuss around the cold frame is a very nice activity 😊 not to mention that early germinating species can take you by surprise.
With the pots buried in the ground there is usually more work to be done as soon as the soil warms up, in case the location is not proper for germination (for example a heavy shaded area). Larger containers are usually to be kept in place; remove the layer of leaves/mulch if it was added and check for slugs; in recent years also cutworms have become a real problem (and they are active at very low temperatures).
If the location is not proper for germination, take the pots out, organize them in a tray/box and lift them up on an elevated surface.
Leaving them buried in the ground, will either delay the germination or expose the fresh, succulent seedlings to various ‘accidents’. Check the bottom of these pots for little slugs or slug eggs; often they hide in between the pots in late fall waiting hungrily for the first ‘victims’. The emerging seedlings can be devoured so fast that it may seem there was no germination at all!
Some species are germinating at low temperatures regardless of the cold stratification method. Depending on the temperatures the first signs of germination are possible in March in our climate even when the pots are looking somewhat ‘frozen’.
From my experience, among the early spring germinators are: Adonis, Corydalis species, Claytonia, Fritillaria, Galanthus, Crocus species, Erythroniums, Hepatica, Helleborus, some species peonies.
How to handle our pots, without a cold frame
If you provided cold stratification underneath your patio table/bench, it is very simple, lift them up. It is not that they can be used for something else until May at least.
A  good, not expensive investment it is a small, plastic ‘greenhouse’ with a detachable cover. It is light and can be moved around; when it really warms up, replace the plastic cover with a shade cloth.
I also use a folding plastic table and I recommend it as a good option.
Advantages: they come in various sizes, are easy to move around to the best locations from early spring to summer, you can put the flats underneath when it rains heavily…also they have a very good work-height for transplanting the seedlings later! When you’re done, fold it back and put it away.
During the spring (meaning late May!), be on guard for heavy rains, late frosts and not to mention late flurries!!! The pots and the emerging seedlings need protection. Keep some plastic sheets/fleece blankets handy.
If you followed the fridge cold/moist stratification, you need to constantly check for signs of germination. Most times not all seeds germinate at once. Wait until a good percentage of seeds have developed radicles and gently plant them in a pot and keep them outdoors if weather allows or at room temperature (it depends when it happens, so you may need indoor lights).
Will all seeds germinate at once?
Many species have a uniform germination. So, after the seedlings grow up a bit, they can be pricked out, if necessary. * Not all species require pricking out in the first season.
However, other species may germinate gradually over the spring, or over a couple of years (Delphinium fissum, Hepatica, Sanguinaria sometimes, etc.).
In this cases, we believe to be ‘poor germination’, when in fact it is the plant’s mechanism of germinating gradually to give its seedlings better chances of surviving. Wait until you have a few good seedlings to transplant or, keep the pot ‘as is’ until next year.
 What happens if species that are actually warm germinators were sown in the fall/winter?
Nothing bad; good seeds should germinate in late spring with the raise of temperature, if they were sown accordingly with their germination requirements.
Before using an indoor lighting system which allows for an early sowing, all species were sown in late fall/early winter and all were overwintered outdoors, either under the snow or in the cold frame. It was never a problem for the usual warm germinating species. Cirsium cannum was overwintered in a tray under snow (shown in the previous post). Other well known warm germinators like Centaurea and Gypsophila species were also sown in late fall with good results.
What to do with the non-germinated pots?
As I mentioned, some species are early germinators at lower temperatures, meaning late February to March, depending on the weather.
From my experience, most other species will germinate between April to early May, in our region. There may be exceptions (Disocorea caucasica for example) but generally speaking if something had not germinated by mid June it won’t happen later in the season.
Organize these pots and keep them together in a part-shaded spot, or again in a box; redo the labeling. Do not forget to check the moisture throughout the season. By late fall, repeat the cold stratification. Some of the very early spring germinators (like Corydalis, Claytonia, Crocus) become dormant in June, so you can group all these pots together.
As I tried to explain, there are many reasons for failed germination. Sometimes, seemingly good looking seeds may have internal defects impeding embryo development or germination. When we sow the actual fruits, we cannot even have a visual assessment of the actual seeds.
Some species naturally need repeated cycles of warm/cold, meaning 2-3 years until germination. Not many people are keeping and taking good care of their pots for so long.
However, sowing every year a few pots with a variety of species it is the key of having seeds germinating, seedlings growing and new plants flowering every season!
*Special attention to all species from Aster family: most of them are warm germinators. No matter how you sowed them, they should germinate in the spring. If they don’t, most likely the fruits/seeds were not good: Asteraceae: seeds, achenes and cypsaele
The Germination page has been reorganized with the cold stratification subject listed under Treatments for seeds germination.
Cold stratification: part 1, dormancy
Cold stratification: part 2, FAQ
Cold stratification: part 3, the practicals
Easter #2
PropagationHappy Easter to those celebrating this weekend – wishes for peace, joy and hope for new beginnings!
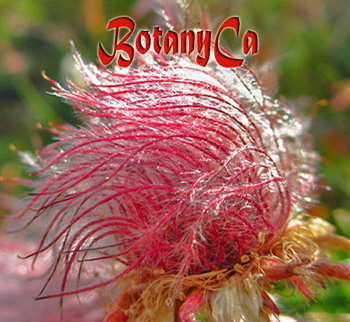
The Pasque flowers are still not blooming, so garden-wise we are celebrating with a few ‘black beauties’, plus a nice form of Corydalis solida – in the feature image.
The dark-red to purple color at emergence of some early spring plants is due to the high anthocyanins content and it is common for most Paeonia species; also for Jeffersonia dubia (Plagiorhegma dubium) and a few others. The coldest the spring weather the darker the shoots/foliage.
The accumulation of anthocyanins in the leaves and stems improve the plants adaptability to low-temperatures. In all cases, the foliage will turn to green as it keeps expanding, in correlation with the rising spring temperatures.
Physochlaina orientalis
Jeffersonia dubia
Cardamine enneaphyllos
Caulophyllum thalictroides
Be careful with the really dark new shoots of Physochlaina orientalis and Caulophyllum; it is very easy to destroy them during the spring cleaning.
Due to its particular germination pattern, Caulophyllum thalictroides moist packed seeds can be ordered again. These seeds require two more cycles: one warm/one cold for germination (in translation, one more year sown outdoors).
*A few shoots of Caulophyllum were found on a location that receives sun for half of the day right now; in more shaded sites they may not be present yet (do not scratch the ground looking for the young shoots as they are very fragile in early spring).
Easter
PropagationTo those celebrating this weekend – Happy Easter, with love, peace, hope and happiness!
With the weather being as it was/is the Pasque flowers (Pulsatilla) are not flowering yet. Some days are still very cold and it is a very rainy spring. Despite this, many spring beauties are awakening and announce the beginning of the new flowering season (a small sample for now :)
Hepatica japonica ‘Cherry Blossoms’
Primula woronovii
Helleborus purpurascens
Primula sibthorpii
Friday’s seeds – Dalea purpurea
PropagationBack again with the hugely (un)popular Friday’s seeds, by necessity.
In the first week of March I used the HWT on a small lot of Dalea purpurea, purple prairie clover ‘seeds’. Using the whole dispersal units (calyces containing the pods with seeds), I didn’t see how much the seeds have imbibed (a sign that the seedcoat was fissured). It would be tedious to remove the seeds by hand, so, those who purchased Dalea ‘seeds’ also received the whole calyces, which together with the pods and seeds inside are the plant’s ‘dispersal units’ (larger seeds companies will separate the seeds with a machine).
I sowed them the next day; on the same day, I also sowed a small pot with untreated calyces. In both cases the germination was been poor, to use a nice term; only 1 seedling on each pot.
For this reason the situation begs further study.
For Dalea purpurea, until you see the actual seeds, it is not easy to guess being in the legumes family (Fabaceae). The seeds remain enclosed in 1-seaded pods and these are in turn included within the persistent, fuzzy calyces. As a whole, again these are called dispersal units. Some are wrongly calling them fruits.
Where are the actual fruits? And how do they look? By gently squeezing a dry calyx, the seed enclosed in a papery outer covering comes out. It doesn’t look like a pod, but that’s what it is: a pod with a very thin fruit wall, as seen in the image below.
Dalea purpurea (purple prairie clover) dispersal units: calyces, pods and seeds
Dalea purpurea seeds after one treatment with hot water
Now that we deciphered the Dalea fruits-seeds dilemma, back to the HWT yesterday, using cleaned seeds this time. This is how they looked today; about ½ have imbibed well and were already sown.
Possible reasons for the poor germination in the first attempt:
A single HWT treatment wasn’t enough to break the seedcoat (for genera like Hedysarum and Astragalus the seeds need 2-3+ treatments with hot water); it is also be possible that the presence of calyces impeded the process.
Second reason: the temperature at which the pots are kept is +/- 21 C daytime. I found a study that indicates 25C as a good temperature for germination. It is likely that more seeds will germinate in time, but we aim for a more uniform germination.
I’ll update the germination info on the product page, as soon I have more data. Keep in mind that scarification can always be employed instead of HWT, I just do not like to use it, especially for small size seeds.
Happy Spring equinox
PropagationToday we welcome the astronomical spring in the Northern Hemisphere, even if it doesn’t look like it in our region. However, the few early flowers and the colourful buds of Helleborus and Hepatica agree with the announcement (Hepatica transsilvanica flower bud in the top image).
So, we are getting ready, transplanting seedlings and maybe even sowing some annuals.
I will add a bit more info about the transplanting subject for now.
We try to grow many different perennials species, and there are situations when the most common rules for pricking out don’t apply. It is disheartening to have a nice germinating pot with seedlings only to lose them when transplanting.
Most such seedlings will develop very long, thin roots in search for good conditions, soil and water wise, and to anchor themselves well into the ground.
Most often these are species that can be found in the wild growing on thin substrates, among rocks and crevices. The thin, long roots can squeeze themselves into the thinnest cracks of the rocks.
I will use as an example Erigeron vagus (Rambling fleabane)* sown this year. Notice the low size seedlings, maybe 0,5 cm tall (left) by comparison to the roots, which are already tangled at the bottom of the sowing pot (right image).
Many alpine species are in fact easy to germinate but they are difficult to handle later at the seedlings stage. It is best to watch closely the bottom of the top and if you see roots protruding, it is time to transplant them no matter of the size of seedlings above the ground. Even so, sometimes the fine, long roots are already circling at the bottom of pots, which is not ideal (ideal would be to transplant very tiny seedlings soon after germination, but that is also difficult).
Skipping the transplanting and planting the whole sowing pot in the rockery is not a good option in this case. So, we have to give it a try even at this stage. *Erigeron vagus – the seeds were received from a seeds exchange, so I keep the name. It is an Erigeron for sure but remains to be seen after flowering if it is truly E. vagus.
As I mentioned in another post, let the pot dry out before transplanting; the roots will break more easily if the mix is too wet (and heavy).
Then, gently separated some of the seedlings (inevitably we will lose some of the roots and seedlings in the process). Plant 2-3 seedlings together/pot (in case some won’t make it). Here are the seedlings after one week. With care and patience, we can succeed!
Superb fringes
Plant portraits, PropagationSuperbus, superba, superbum – Latin adjectives used as specific epithets in the scientific names of many plants and animals.
Back in stock after a few years absence: Dianthus superbus ssp. sajanensis, a truly superb Dianthus. I am very taken with this subspecies from the Sayan Mountains with large, pink, fragrant flowers with deeply tasseled petals.
It has an excellent cold hardiness, enjoying relatively moist and sunny to light shaded locations.
Dianthus superbus ssp. sajanenis seedlings, March 2026
Unfortunately, a very hungry and probably angry rabbit chewed down my plant a few years ago and it didn’t manage to recuperate well afterwards.
Never have just one plant of something you really like 😉
The back-up seedlings are growing under lights now and I can share the rest of the seeds. Like most Dianthus, it is easy to germinate (in this case, 3-4 weeks of cold/moist stratification give best results), the seedlings are fast growing and usually will start flowering after two years.
Dianthus seedlings are still small, but some other species grown under lights, like the Papaver bracteatum shown not so long ago, are in need of transplanting. Those requiring advice on this subject can review 2 older posts:
Pricking- transplanting seedling
Transplanting seedlings #2
plus do not forget about the most recent one: Addendum to (not)pricking out seedlings.
Repetition
Friday's Seed(s), PropagationLike most other years, the first week of March brings with it the first snowdrops (early forms) and the hope for the spring’s arrival. It is always an exciting time when we are eager to start working in our gardens. Until possible to do so, plans are being made and (too many) seeds are sown.
After watching many nice plants pictures over the winter some people might also purchase seeds on an impulse.
Most seeds orders from late February and March always have in common a combination of species: warm and cold germinators. It is nothing wrong about it, but it is important to know how to proceed for best results. Good timing for sowing is very important; please review a previous post if needed:
Timing the sowing in the spring.
Astragalus missouriensis seeds after 1 hot water treatment; notice only 2 imbibed seeds. Astragalus species have particularly hard seedcoats and 2-3 treatments are necessary.
Also like in most other years, at this time I use the Hot water treatment on a few species from the Fabaceae family. Please access the link provided, if you want to know more about this easy to apply germination treatment (and related posts): FAQ – Hot water treatment.
On my list this year: Hedysarum boreale, Astragalus missouriensis, Lupinus perennis and Dalea purpurea (Purple prairie clover).
All these native species would make good additions to my garden: drought resistant, pollinator magnets, and set to improve the soil, like all other legume plants do.
The Purple prairie clover seeds are supposed to germinate at room temperature without additional treatments, but I never germinated it before and it is best to double check it (I will sow few seeds with and without the HWT treatment).
Also, on the account of a Fridays seeds – an image with Dalea purpurea ‘seeds’. In this case, the seeds (and pods) remain enclosed in their fuzzy calyces and are sowed as such, in most cases. I would use the HWT the same. I removed a few of the actual seeds just for the demonstration purpose only.
Dalea purpurea, Purple prairie clover ‘seeds’ enclosed in fuzzy calyces and the actual seeds (seen to the right)
A feast with poppies
Plant portraits, PropagationThe days are noticeable longer and the seeds are germinating; the spring cannot be too far away :) Having the indoor lights fired up, I also sowed some older seeds just for testing.
Papaver bracteatum germination at room temperature, February 2026
Papaver bracteatum (Iranian or Persian poppy) seeds displayed an amazingly good germination, even if a few years old. There is no reason not to share the seeds again and spread the joy of this truly red poppy.
The large, pure red flowers are a sight to behold in June, and it is actually not a difficult plant in the garden, it only needs a sunny location with good drainage. The rosette of new leaves emerges in the fall and overwinters until spring under the snow. After flowering, the foliage starts yellowing and dies down, to repeat the cycle again starting fall. It is an amazingly cold hardy perennial poppy.
Larger size perennial poppy plants transplant badly due to their taproots. For this reason, it is recommended to grow them from seeds.
The seeds germinate well at room temperature for an early start (or sow outdoors in late spring) and the seedlings are not difficult to transplant. Because the germination is very good, I recommend to sow fewer seeds/pot; the seedlings will have more space to develop.
The grown up seedlings establish easily in the garden when planted in a good location later in the summer.
Add these three handsome perennial poppies to your garden for yearly bursts of colors: Papaver bracteatum, Papaver chakassicum and Papaver atlanticum ‘Flore-Pleno’.
Papaver bracteatum
Papaver chakassicum
Papaver atlanticum ‘Flore-Pleno’
And, for a good poppy feast, no one is stopping you to direct sow in late spring a few seeds of the annual Papaver macrostomum ‘Black Magic’. My favourite companion for Papaver chakassicum is in fact another easy to germinate and grow species: Polygala major. They can be planted together in the rockery or in any sunny, well drained garden spot. Two easy to grow plants for major visual impact!
Ready, start, go – 2026!
PropagationRosette of Ipomopsis rubra on a sunny November day last year; ready for flowering this summer.
The traditional February post on indoor sowing for the records. Actually, I started sowing last week with quite a few accumulated seeds from last year when I sown very few species. Here are the previous February posts, each with details on sowing, warm germinators and other related indoor sowing issues:
Ready, start, go – 2024! ; Ready, start, go – 2023! ; Ready,start, go- 2022!
I am sowing every day 3-4 species, to make it last longer and to have a gradual germination and seedlings to handle later on. This year I am mainly sowing a few species I previously had and then lost from the garden. We are usually blaming the weather, the not ‘perfect’ location and so on… Truth to be told, many perennials have a naturally short life. Those that require a very good drainage are prone to have an even shorter span life than usual.
Then we have the biennials, which are not always self-seeding. For example, I have new plants to flower this summer for Ipomopsis rubra (warm germinator) and Cirsium edule, but no new rosettes for Bukiniczia cabulica and Erysimum witmanii ssp. transsilvanicum.
Today on the sowing menu alongside Silene jailensis, Bukiniczia cabulica and Echinops crispus (which acts like an annual most years), there was a mystery Draba that flowered for the first time last spring. I forgot to note a few fine details for the leaves which are under snow right now; so seeds are not shared at this time.
‘Mystery’ Draba, early spring flowering, 2025; the plant in fruit it is shown in the gallery bellow
The issue of misidentification for the Draba species comes to light again.
Most Draba seeds from exchanges are probably misidentified and it is no surprise because some seed companies are selling misnamed species, and some nurseries are selling misnamed plants; and their seeds go around and around….
Eager gardeners that like to show and share their ‘well-labeled plants’ are adding to the misidentified pictures mayhem over the net. Thus, 95% of the images that show up on google searches are probably misnamed.
To identify Draba species, I recommend to use only various Flora treatments (Flora of North America, Flora Europaea…) plus images from on-line Herbarium repositories.
True to name species images can be seen for some species on iNaturalist and on other botanical sites, like for example Oregon Flora (for NA species).
For example, my new mystery Draba came labeled as Draba sphaeroides (actually the valid name being Draba cusickii). A look at the images of this species on the link below, will quickly reveal even for the non-specialist eye that my plant belongs to a different species.
https://oregonflora.org/taxa/index.php?taxon=4627
Why do I continue to sow Draba? I belong to the relatively small group of Draba afficionados. Draba species are among the easiest rock garden plants to grow with evergreen rosettes very satisfying in themselves. Some of them start flowering in early spring when most other plants are dormant, joining the snowdrops, Crocus, Corydalis, Hepatica and few other early spring flowers.
I am sure that if their range of flower colors would be more extensive, more people would join the Draba club.
The new mystery Draba flowers very early at the same time with Draba aizoides, sometimes in mid to late March! (if no snow). They are followed by Draba haynaldii and the white flowering Draba dedeana – known to try and steal the early flowering prize in some years.
Draba ‘mystery’, March, 2025
Draba ‘mystery’ 2025, June
Draba aizoides
There are still available seeds of Draba haynaldii (early flowering) and Draba lasiocarpa (May-June flowering) for those interested; plus other warm germinators easy to start from seeds.
Draba haynaldii
Erinus alpinus purple
Aurinia saxatilis
Erigeron compositus
Addendum to (not)pricking out seedlings
PropagationOur seeds are germinating. We proudly look forward to the next stage, that of pricking out or transplanting the seedlings. This subject was previously discussed (and I just updated both previous posts: Germination page).
 However, we have to keep in mind that not all seedlings are happily waiting for this moment! Regardless when the seeds are germinating, in early spring indoors or late spring outdoors, I want to emphasize that various species are actually resenting being transplanted in the first year after sowing.
Pricking-transplanting seedlings
Transplanting seedlings #2
Seedlings of those species are best grown in the same pot for 1-2(3) years.
Transplanting them is best done only during their dormant stage (otherwise, most will go dormant right away).
In case the sowing pot is too small for how many seeds have germinated, let them grow up a bit, and then gently ‘transplant’ the whole pot into a larger one.
Most of these species are monocots (those where you see ‘grass-like’ leaves); other genera besides the ones below should be treated the same. Another tell sign that seedlings may resent pricking out in the first season: generally speaking, species from the bulbs/tubers/rhizomes category.
Genera/Species that resent being pricked out in the first season, from my own experienced.
Streptopus amplexifolius seedlings
Allium, Corydalis, Claytonia
Fritillaria, Crocus, Galanthus
Erythronium, most Lilium species
Ornithogalum, Tulipa, Zigadenus, Veratrum
Arum, Arisaema
Clintonia, Medeola, Trilliums, Uvularia
Streptopus, Prosartes, Disporum
I also grew in the sowing pot Sanguinaria and Jeffersonia for 2 years
Podophyllum peltatum and other Podophyllum species
Roscoea, Glaucidium palmatum
*Species from the Fabaceae family (legumes)
Also, Paeonia species – I do not know what other people are doing, I’ve always grown the peonies in the same pot for 2(3) years (or if they were transplanted young, it was done in the dormant stage).
Podophyllum peltatum first year seedlings
Arisaema fargesii seedlings
Veratrum formosanum 2016
Trillium grandiflorum 2 years-old seedlings
What should we do with these seedlings if not transplanting?
Keep them growing well in the sowing pot, meaning: water as often as needed, apply a light fertilizer once in a while, provide good light conditions.
The better looking the foliage, the more developed the underground system will be (bulbs, tubers or rhizomes). On longer terms, this means faster growing plants and later faster flowering – which is our main objective!
Genera/species with a short growing period
Some of the listed species are naturally having a very short growing season of 3-4 months, just like the mature plants in the garden: Claytonia, Corydalis, Erythronium, Crocus, Galanthus, Roscoea, Tulipa (and other like-species). It is even more important to maximize the seedlings growth!
Corydalis solida seedlings
Claytonia virginica
Erythronium grandiflorum seedlings
At the point the seedlings go dormant, which is easily noticed because the leaves will start withering, keep the pots on the dry side (a box can be used again to keep them from drying out excessively during the summer/fall). Protect the pots over the winter and by next spring repeat the process. Again, in case of overcrowding, the tiny bulbs/tubers can be transplanted into larger pots when fully dormant.
Growing Corydalis and allies from seeds
Growing Roscoea from seeds
Growing Glaucidium palmatum from seeds
Growing Podophyllum from seeds
*Species from the Fabaceae family (legumes)
It is a well known fact that these species resent transplanting. Some are best sown directly in the garden in late fall.
Baptisia germinating seeds
The reason for this is that they all form a very long taproot, a trait that can be noticed even in the young seedlings. The fact that they require various mycorrhizal fungi for their growth is secondary to the taproot problem.
I mostly tried germinating such species with the Hot water treatment (HWT), sown the germinated seeds only 2-3/pot and later planted them as a whole in the garden as soon as the weather allowed. Scarification of the seeds can of course be used instead of the HWT treatment.
If you really need to prick out the seedlings, do it when they are very young/small.
For Hedysarum, Lupinus, Thermopsis and Baptisia this works well.
I never had much success with Astragalus and Oxytropis species, at least not on long term, but the garden conditions are to blame, not the process of handling the seedlings. Sowing such species in the fall outdoors and letting the weather do the whole work for you, it is also an option. Lathyrus vernus, Lupinus species usually germinate well after ground sowing (they also self-seed around) and the seedlings can be moved to the desired place when young.
This being said, I just started my indoor sowing with a few Roscoeas species. I can provide better care for them in February-April than later when the spring garden mayhem starts. Mid to late February is a great time to start indoors not only Roscoea and Arisaema, but also various other warm germinators (click for: easy to germinate and grow species).
Time will fly watching the germination and taking care of the seedlings. When spring arrives, they will be large enough for outdoor acclimation.
Cold stratification: part 4, springtime
PropagationPaeonia mlokosewitchii shoots after cold stratification; the first stage, roots growing was shown in the previous post (Cold stratification: part 3, the practicals)
Finally the spring arrives – only in our story about the cold stratification 😊We tried our best sowing and providing the cold stratification.
Is there any guarantee that all seeds will germinate well?
Of course not, hope is good, but kept on the realistic side. Sowing and germinating seeds is not a precise science, and many factors, some out of our control, can contribute to a low germination or no germination at all; reason why keeping your pots for at least another year it is always a good idea.
However, at least some species will germinate, and then you may have to deal with too many seedlings! I always recommend to sow smaller batches of seeds every year, instead of 30 pots at once. And, combine easy germinating species with some of the more difficult ones.
What to do when the weather starts to warm up?
I would like to say that we just sit and watch the seeds germinating, but it’s not quite like that 😊
Caulophyllum thalictroides first shoots, after direct sowing (2 years germinator!); work carefully in the spring around the spots where you’ve sown seeds in the ground.
Usually a visible warm up may happen in March in our region, sometimes even later. Not all winters are the same. Unlike the groundhogs, I predict that we will have a very late spring, with short interludes of warm weather here and there.
In case of direct sowing, after the snowmelt, remove the layer of dead leaves/mulch or any other materials you used for extra protection. The best is still to come weather wise, so watch the spot for germination without scratching the ground! In shaded locations it is a good idea to sprinkle a bit of slug pellets around (for just in case).
In case of sowing in moss, there is nothing else to do than waiting for the germination. If too many seedlings appear you will have to transplant some of them later in the season.
In case you sowed in pots, after the snow has melted, open the box(es), or remove any other wrappings from the trays and cold frame to inspect the pots. Most of them will be frozen. Do not worry (follow cold stratification parts 1,2,3); slowly they will start to warm up.
Ideally, boxes and flats with pots should be lifted from the ground on a higher surface to receive more light = warmth. It also makes it easier to keep an eye on them. If March is still very cold, then do this in April.
In case of using a cold frame: open the lid as soon as possible and remove some of the protecting materials. Make a thorough inspection for slugs (eggs can also be at the bottom of pots). Let the lid open as much as possible during warm, sunny days and close it back at night. Most likely you can let go of a part of the wrapping layers.
There is not much to do in the garden so early in the spring. To fuss around the cold frame is a very nice activity 😊 not to mention that early germinating species can take you by surprise.
Corydalis seedlings, frame April 30 2019
Claytonia virginica, March 2018
Galanthus, cold frame 2018
With the pots buried in the ground there is usually more work to be done as soon as the soil warms up, in case the location is not proper for germination (for example a heavy shaded area). Larger containers are usually to be kept in place; remove the layer of leaves/mulch if it was added and check for slugs; in recent years also cutworms have become a real problem (and they are active at very low temperatures).
If the location is not proper for germination, take the pots out, organize them in a tray/box and lift them up on an elevated surface.
Leaving them buried in the ground, will either delay the germination or expose the fresh, succulent seedlings to various ‘accidents’. Check the bottom of these pots for little slugs or slug eggs; often they hide in between the pots in late fall waiting hungrily for the first ‘victims’. The emerging seedlings can be devoured so fast that it may seem there was no germination at all!
Anemone quinquefolia, in ground stratification 2018
Container sowing, ground 2018
Corydalis-solida-seedlings, in ground stratification 2017
Some species are germinating at low temperatures regardless of the cold stratification method. Depending on the temperatures the first signs of germination are possible in March in our climate even when the pots are looking somewhat ‘frozen’.
From my experience, among the early spring germinators are: Adonis, Corydalis species, Claytonia, Fritillaria, Galanthus, Crocus species, Erythroniums, Hepatica, Helleborus, some species peonies.
How to handle our pots, without a cold frame
If you provided cold stratification underneath your patio table/bench, it is very simple, lift them up. It is not that they can be used for something else until May at least. good, not expensive investment it is a small, plastic ‘greenhouse’ with a detachable cover. It is light and can be moved around; when it really warms up, replace the plastic cover with a shade cloth.
A
I also use a folding plastic table and I recommend it as a good option.
Advantages: they come in various sizes, are easy to move around to the best locations from early spring to summer, you can put the flats underneath when it rains heavily…also they have a very good work-height for transplanting the seedlings later! When you’re done, fold it back and put it away.
During the spring (meaning late May!), be on guard for heavy rains, late frosts and not to mention late flurries!!! The pots and the emerging seedlings need protection. Keep some plastic sheets/fleece blankets handy.
If you followed the fridge cold/moist stratification, you need to constantly check for signs of germination. Most times not all seeds germinate at once. Wait until a good percentage of seeds have developed radicles and gently plant them in a pot and keep them outdoors if weather allows or at room temperature (it depends when it happens, so you may need indoor lights).
Will all seeds germinate at once?
Many species have a uniform germination. So, after the seedlings grow up a bit, they can be pricked out, if necessary. * Not all species require pricking out in the first season.
However, other species may germinate gradually over the spring, or over a couple of years (Delphinium fissum, Hepatica, Sanguinaria sometimes, etc.).
In this cases, we believe to be ‘poor germination’, when in fact it is the plant’s mechanism of germinating gradually to give its seedlings better chances of surviving. Wait until you have a few good seedlings to transplant or, keep the pot ‘as is’ until next year.
Nothing bad; good seeds should germinate in late spring with the raise of temperature, if they were sown accordingly with their germination requirements.
Before using an indoor lighting system which allows for an early sowing, all species were sown in late fall/early winter and all were overwintered outdoors, either under the snow or in the cold frame. It was never a problem for the usual warm germinating species. Cirsium cannum was overwintered in a tray under snow (shown in the previous post). Other well known warm germinators like Centaurea and Gypsophila species were also sown in late fall with good results.
What to do with the non-germinated pots?
As I mentioned, some species are early germinators at lower temperatures, meaning late February to March, depending on the weather.
From my experience, most other species will germinate between April to early May, in our region. There may be exceptions (Disocorea caucasica for example) but generally speaking if something had not germinated by mid June it won’t happen later in the season.
Organize these pots and keep them together in a part-shaded spot, or again in a box; redo the labeling. Do not forget to check the moisture throughout the season. By late fall, repeat the cold stratification. Some of the very early spring germinators (like Corydalis, Claytonia, Crocus) become dormant in June, so you can group all these pots together.
As I tried to explain, there are many reasons for failed germination. Sometimes, seemingly good looking seeds may have internal defects impeding embryo development or germination. When we sow the actual fruits, we cannot even have a visual assessment of the actual seeds.
Some species naturally need repeated cycles of warm/cold, meaning 2-3 years until germination. Not many people are keeping and taking good care of their pots for so long.
However, sowing every year a few pots with a variety of species it is the key of having seeds germinating, seedlings growing and new plants flowering every season!
Saxifraga cuneifolia ssp. robusta, cold stratification in moss
Helleborus caucasicus seedlings, 2018
Thalictrum thalictroides
Zigadenus elegans ssp. glaucus seedlings
Geum triflorum seedlings
Gillenia trifoliata, 2016
*Special attention to all species from Aster family: most of them are warm germinators. No matter how you sowed them, they should germinate in the spring. If they don’t, most likely the fruits/seeds were not good: Asteraceae: seeds, achenes and cypsaele
The Germination page has been reorganized with the cold stratification subject listed under Treatments for seeds germination.
Cold stratification: part 1, dormancy
Cold stratification: part 2, FAQ
Cold stratification: part 3, the practicals
Cold stratification – part 3, the practicals
Wildflowers of North AmericaCold stratification – part 1, dormancy
Cold stratification – part 2, FAQ
Let’s dive into the methods used for providing cold stratification as a seeds germination treatment, drawing from my personal experience. They often overlap with the sowing methods (also mentioned for seedlings winter protection). It makes sense because all are interrelated .
Natural cold stratification = sowing in the ground (I also call it sowing ‘in situ’)
This is the easiest method of providing cold (moist) stratification for seeds. We actually reproduce what’s happening in nature!
This type of sowing/stratification can be done until the ground freezes, so probably early November for our region would be safe to give as a limit. In case of ‘in situ’ summer sowings (Corydalis, Asarum, Hepatica…) you will ensure first a natural warm/moist and then a cold stratification.
Incorporating potting mix in the top layer of sowing will provide a better substrate for the future seedlings.
Cons: selecting a proper location is the key to this method; it should be good for the germination and further growth of the plants. In this case we usually do not aim to transplant the young seedlings.
The seedlings are prone to be easily damaged in first stages and so their mortality may be higher than in pots. Sowing seeds in larger quantity it is necessary in order to establish young plants.
Despite the cons, many wildflowers are self-seeding with success in nature, and even in the garden. Lobelia siphilitica, Asarum canadense, Corydalis, Hydrophyllum, Geum rivale, Iris versicolor, Lathyrus vernus, Primula mistassinica to mention just a few, are regularly self-seeding in my garden.
In case of hemiparasitic species it is definitely worth trying. Although I had Castilleja species germinating well in pots, a flowering plant was obtained one year only after sowing seeds directly in the garden.
Erythronium grandiflorum seedlings, in situ sowing 2021
Castilleja coccinea seedlings 2022, in situ sowing
Another nature inspired method involves Providing cold stratification in moss (outdoors).
This was shown for Gaultheria procumbens, and it involves sowing the seeds in moss, in the garden or on a piece of moss placed in a pot outdoors. The moss will provide protection and constant humidity for the small seeds and seedlings.
For those more creative, a piece of decaying stump or a boulder are good opportunities to try and establish moss and then sow suitable species.
Saxifraga cuneifolia moss sowing, 2015
Moss with Gaultheria procumbens
This method can be tried for Gaultheria, Coptis trifolia, Trientalis borealis, Maianthemum canadensis, Cornus canadensis, shade growing Saxifraga, Rhododendrons and probably many others. In nature, we always see young Hepatica americana and Gaultheria procumbens seedlings germinated in moss patches.
Cold stratification in pots or larger containers buried in the ground
In this case we sow in pots or in larger containers and then place them in the ground. We can start with the first summer sowings and continue until late fall before the ground freezes. You can use an ’empty’ area between the garden plants, or organize a special place in the garden ‘out of sight’.
Sowing in a larger container works very well for species with the same germination requirements that need to be grown in the same place for 2-3 years.
Before the winter, add a layer of dry leaves/mulch for extreme cold protection; it will also help compensate for the lack of snow (if).
Avoid low areas where a lot of water might stagnate in early spring after snow melt!
Cons: the location to keep the pots for the winter may not also be the best for the germination and growth of the seedlings; you may need to move them in the spring in another location. For this reason, many times I keep the pots buried for the winter and then move them as soon as the spring arrives. It adds as extra work to be done.
Summer sowings need constant monitoring/watering and being ‘buried’ in the ground, makes it easy to forget about them.
The seedlings are also more prone to damage in early stages.
Cold stratification in the ground, 2019
Sowings for cold/moist stratification: Diphylleia, Daphne…
Cold (moist) stratification above ground
For those who prefer the ‘cleaner’ or classic method, sow in pots/containers and provide the cold stratification above ground.
We need something to keep the pots together, hence the box method, easy to bury in the snow during the winter.
Any other container type, small or large, plastic trays, work well to keep the pots in place. Over the years I have also used plastic (nursery-type) trays with a mesh on top, but that came with the challenge of fixing the mesh. Another option is to wrap the trays in a plastic sheet, which works pretty well.
Cold stratification in a box, 2025
Cold stratification tray/plastic,2015
As previously mentioned, make your cold storage pile in a shaded area to make sure the snow remains compact and doesn’t melt during our rare sunny days. Be creative in using your garden space: underneath a patio table, a bench, beneath eavestroughs or a large evergreen tree…This way the pots will also be protected from occasional heavy rains, an important fact to keep in mind in the spring when the emerging seedlings are very fragile.
Cons: snowless winters can be problematic for protecting the pots from extreme cold.
The pots will need to be handled/moved around multiple times.
Cold frame November 2017, before adding insulation and a lid
If you want to grow a lot of plants/species, a classic frame or a simple wood framing are very valuable in our climate. They do not need to be fancy and have multiple advantages.
Place your pots inside tight together and towards late fall add some insulation along the edges: plastic sheets, bubble foil insulation…); on top better to add a thin fleece and a plastic foil. A lid is beneficial and it can be easily improvised, by making a light frame with plastic in between. This is what I used when I had my very simple, home-made frame and it worked well.
The advantage of a frame is that you can easily add bubble sheets and tarps on top of the frame to compensate for the lack of snow. You will still find the pots frozen when first opening the frame, but apparently the temperature remains acceptable. Various seeds always germinated well and all young seedlings survived.
A frame also provides a good place for keeping all your pots organized together: sowing and seedlings during the growing season (a shading cloth/anti-critters mesh to be used during the season).
Cons: a limiting factor in this case is having a proper, large enough space with good exposition for installing the frame. Avoid a south facing location because during the summer it will get too hot for small size seedlings and the pots will dry faster.
For people with mobility issues, working with a ground frame may pose problems; there is a lot of bending and crouching involved to oversee the pots.
Cold (moist) stratification provided in the fridge
In this purpose we place the seeds between moist paper towels enclosed in plastic bags, in moist media (vermiculite, perlite…) or keep whole pots in a dedicated fridge/shelf. This method was advertised a lot as a space saving method and it looks ‘attractive’. I employed it for a while, discovering its many disadvantages in the process.
Cons: the seeds need to be inspected frequent, especially in moist towels. Even if you pay a lot of attention, you may find germinated seeds with the roots entangled in the moist towel, or even worse with etiolated shoots.
Most important, most seeds do not germinate uniformly and they would need potting up when/as it happens; damage to the rootlets when potting up is also a factor.
Poor germination results are also possible due to the constant fridge temperature, and also because of the molds sometimes forming on the seeds (when using moist towels).
Asclepias exaltata germinated seeds in/through moist towel, 2018
For these reasons I now consider this as a last method for cold stratification by those living in a cold climate. In any case, stratification in moist media is preferable than using moist towels, with the exception of very fine seeds.
I recommend the fridge stratification only if it is too late to provide the stratification outdoors, to keep seeds moist at cold for a very short period, or when a reliable method that works well has been developed, like for example: How to easily germinate Hydrastis canadensis.
***Special attention is needed for the seeds that were sown early in the season like: Hepatica, Sanguinaria, Corydalis, Jeffersonia… in fact the whole category of the ‘moist-packed’ seeds which have been discussed ad nauseam in this blog.
I found this image from November 2014! showing with my first germinated seeds of Paeonia mlokosewitchii! (roots only; the top layer of potting mix was removed to take the picture). We will see the germinating shoots in part 4.
But let’s not forget that other species also require first a lightly warm cycle followed by a cold stratification in order to germinate well: most Paeonia species, Helleborus, Actaea, Aralia, Hydrophyllum, Viburnum…
Keep in mind that in this case, by fall there are radicles/tiny rhizomes growing in the pots!!! (the lightly warm/moist cycle), even if we do not see any growth above the potting mix.
A cold stratification it is then needed for the shoots to be induced into growth. For this reason I sometimes called them ‘double stage germinators’ (easy to remember what’s happening).
The best methods for cold stratification for these species are: pots or containers buried in the ground or a cold frame.
Next in Part 4 – spring arrives: what to expect and how to handle the start of germination following all the shown methods.
July colors
Wildflowers of North AmericaLet’s have a short break from the cold stratification with flowers from July 2025, to visually counteract the white, bitterly cold outdoors. There are many plants flowering in July; usually the drought hasn’t installed yet and some of the June flowering plants extend resulting in riot of vivid colors. The seeds collection intensifies in July so there aren’t as many pictures taken like in May. But there are enough for a quick review :)
I will keep the Campanula species separate, for my annual Progress with the Campanulaceae. Phyteuma orbiculare and Physoplexis comosa also flowered in 2025 so it is going pretty well.
A special note for Campanula rotundifolia Kill. (read more here: Campanula rotundifolia complex). It started to flower in June and kept going until fall! A beautiful tall bellflower (it may need support), with ribbon-like foliage and an abundance of flowers. It can be grown from full sun to part-shaded locations.
Campanula rotundifolia (Kill.)
Campanula cochleariifolia
Campanula glomerata ssp. cervicarioides
Images arranged after location: from sun to part-shade and shade
Centaurea jankae
Platycodon grandiflorus ‘Sentimental Blue’
Zigadenus elegans ssp. glaucus
Clematis hexapetala
Echinacea
Crocosmia ‘Lucifer’
Lilium-martagon-var.-pilosiusculum-flowers
Swertia perennis
Mimulus lewisii
Lilium michiganense
Arisaema franchetianum ‘Hugo’
Asclepias exaltata
The majority of the plants shown were grown from seeds. Here’s the breaking down for the germination method:
By sowing in late fall/early winter (cold stratification): Clematis species, Delphinium fissum (seen behind the Centaurea) Swertia perennis, Asclepias exaltata and Zigadenus elegans var. glaucus.
All others: warm germinators (sow in early spring indoors if you use a light stand, otherwise sow in pots in the spring outdoors).
*Lilium species need a warm/cold stratification for complete germination.